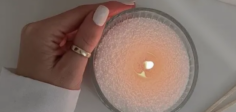
Sand candles are a fun and creative way to make unique, textured candles using sand molds. Instead of buying pre-made molds, you use damp sand to shape and hold the melted wax. Here’s a step-by-step guide to making sand candles wax at home.
Materials You’ll Need:
- Paraffin wax, soy wax, or beeswax (choose your preference)
- Wick (cotton or wooden wick)
- A container to melt the wax (double boiler method is safest)
- Heat-safe container to pour melted wax
- Sand (moist, clean beach sand or craft sand)
- Fragrance oil or essential oil (optional)
- Candle dye or color chips (optional)
- Skewer or chopstick to position wick
Steps to Make Sand Candles Wax:
- Prepare the Sand Mold
- Fill a large bucket or tray with damp sand.
- Use your hand, a cup, or an object to create a hollow space in the sand. This will act as your mold.
- Insert the Wick
- Place the wick in the center of the hollow. Secure it with a skewer or chopstick to keep it upright.
- Melt the Wax
- Melt your chosen wax in a double boiler until fully liquid.
- Add fragrance oil (about 1 oz per pound of wax) and dye if desired. Stir well.
- Pour the Wax into the Sand Mold
- Slowly pour the melted wax into the sand mold, ensuring the wick stays centered.
- The wax will take on the texture of the surrounding sand, giving it a natural, rustic look.
- Let It Cool and Set
- Allow the candle to cool and harden completely (3–4 hours).
- Carefully remove the candle from the sand, brushing off excess grains.
- Trim the Wick & Finish
- Cut the wick to about ¼ inch.
- Your handmade sand candle is ready to light and enjoy!
Tips:
- You can create different shapes by pressing shells, cups, or even your hands into the sand.
- Try layering colored wax for a multi-tone candle.
- Use natural sand for a more rustic finish or fine craft sand for a smoother surface.
📩 For wholesale candle wax, supplies, or bulk orders, contact us at: [email protected]