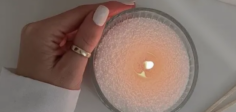
Jelly wax, also known as gel wax, is a unique, transparent candle material that allows for embedding decorative items and creating vibrant layered designs. Making jelly wax candles at home is a fun DIY project, perfect for personalized gifts or home décor.
Materials Needed:
- Jelly (gel) wax
- Heat-resistant container or mold
- Candle wick (recommended thicker or square braided wick)
- Double boiler or heat-safe bowl and saucepan
- Thermometer
- Fragrance oils or essential oils (optional)
- Decorative items (shells, beads, charms – optional)
- Stirring utensil
Step-by-Step Instructions:
- Prepare Your Workspace:
Cover your surface with newspaper or silicone mats. Make sure containers or molds are clean and dry. - Attach the Wick:
Fix the wick at the center of the container using a wick sticker or a dab of melted jelly wax. - Melt the Jelly Wax:
Melt jelly wax using a double boiler. Keep the temperature between 70–85°C (158–185°F) to prevent overheating, which can cause bubbles or discoloration. - Add Fragrance (Optional):
When wax is fully melted, add fragrance oils or essential oils safe for candles (usually up to 6–8% of wax weight). Stir gently for 1–2 minutes. - Prepare Decorative Items:
Arrange beads, shells, or charms in the container as desired. - Pour the Wax:
Slowly pour the melted jelly wax into the container, leaving a small gap at the top. Avoid pouring too fast to reduce air bubbles. - Cool and Set:
Allow the candle to cool completely at room temperature. Avoid moving the candle to prevent cracks or uneven surfaces. - Trim the Wick:
Trim the wick to about 1/4 inch before lighting.
Pro Tips:
- Use containers made of heat-resistant glass or metal to prevent cracking.
- Test small batches first to ensure proper burn and scent throw.
- Jelly wax burns slower than paraffin, so use appropriate wicks.
- Avoid embedding flammable items in the wax.
Contact Us:
For high-quality jelly wax and expert guidance on making decorative candles at home, contact us at [email protected].