Wax pearls—also known as sand wax or pearl wax—have become a popular alternative for creative candle projects. These tiny granules of wax offer flexibility, aesthetic appeal, and most importantly, ease of use. Whether you’re looking to create a floating candle effect or just want to explore a new DIY method, wax pearls are a great place to start.
In this post, I’ll walk you through how to make your own wax pearls at home, and how to use them to craft beautiful, reusable candles.
What Are Wax Pearls?
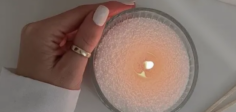
Wax pearls are small, bead-like pieces of paraffin wax (sometimes soy or blended waxes) that look like fine sand or coarse sugar. Unlike traditional candle wax that needs to be melted and poured, wax pearls are poured directly into a container and used as-is. They’re often paired with a freestanding wick, allowing for easy reuse.
Because wax pearls melt only around the wick during burning, the unused wax remains intact—making this one of the most economical and low-waste ways to enjoy candles.
Materials You’ll Need
To get started, here’s what you need:
- Paraffin wax (or pre-made wax pearls)
- A large cheese grater or food processor (for homemade version)
- A glass container or heat-resistant jar
- Candle wicks (preferably metal-based or sustainers)
- Optional: Dried flowers, essential oils, colored wax, or decorative stones
How to Make Wax Pearls at Home
If you’re unable to find pre-made wax pearls, you can make your own with simple tools:
- Melt & Solidify the Wax
Start by melting regular paraffin wax in a double boiler. Once melted, pour it onto a clean baking sheet lined with parchment paper. Let it cool completely and harden into a thin sheet. - Shred the Wax
Once the wax is fully hardened, break it into chunks and use a cheese grater or food processor to shred it into small, bead-sized granules. The finer the better—you’re aiming for a sand-like texture. - Optional: Add Color or Fragrance
You can add candle dye or essential oils before pouring the melted wax, or you can mix a few drops of fragrance directly into the granules afterward. Just be cautious with the amount—you don’t want the wax to become sticky or oily.
How to Use Wax Pearls for DIY Candles
Once your wax pearls are ready, the fun begins!
- Fill Your Container
Pour the wax pearls into your chosen glass container. You can layer different colors, add flower petals, or include small decorative items like shells or crystals. - Insert the Wick
Use a standing wick with a metal base. Simply press it into the center of the wax pearls. Make sure it’s standing straight and is deep enough to stay stable during burning. - Light & Enjoy
Light the wick and watch as the wax melts gently around it. Unlike traditional candles, only the wax near the flame is consumed. Once the flame goes out, you can remove the wick, insert a new one, and light it again—over and over.
Tips for Best Results
- Don’t over-scent the wax; too much oil can cause smoking or poor burning.
- Always use a container that can handle heat, especially if reusing glass jars.
- Keep the wax level high enough to support the wick, but not so full it overflows when melted.
Final Thoughts
Wax pearls are not only easy and fun to use, but they also allow for creative freedom that traditional candle-making doesn’t. Whether you’re a candle hobbyist, a home decor lover, or looking to start your own small business, wax pearls offer a beautiful, sustainable option.
Give it a try—and let me know in the comments how your wax pearl candles turned out!
This article is brought to you by Waxraw – Candle Wax & Supplies Wholesale.